
Introduction:
Adding some bling to your clothing, accessories, or crafts is a fun and creative way to make a statement. Hotfix rhinestones are a popular choice for DIY enthusiasts and fashion lovers because they are easy to apply and provide a dazzling result. In this step-by-step tutorial, we'll guide you through the process of applying hotfix rhinestones like a pro, ensuring they adhere securely and shine brilliantly.
- Hotfix rhinestones in your desired colors and sizes
- Heat-resistant surface (an ironing board or a heat-resistant mat)
- A household iron with no steam function
- Transfer paper or a special rhinestone applicator wand
- Tweezers
- Garment or item you want to embellish
Step 1: Prepare Your Work Area Before you begin, set up a clean and clutter-free workspace. Ensure you have all your materials and tools within reach, and make sure your iron is clean and doesn't have any water in it.
Step 2: Plan Your Design Decide on the design you want to create with the hot fix rhinestones. You can sketch it on the fabric or lay out the rhinestones to get a visual idea. Once you're satisfied with the design, you're ready to start.
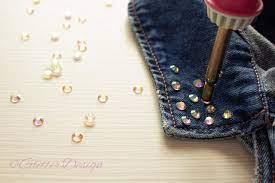
Step 3: Position the Rhinestones Place the rhinestones on the fabric or item, adhering to your planned design. Use tweezers to pick up and position each rhinestone precisely where you want it. Make sure they are all facing the same direction with the glue side down.
Step 4: Apply the Transfer Paper or Applicator Wand To transfer the rhinestones onto your fabric, you have two options:
- Transfer Paper: Cut a piece of transfer paper to the size you need. Lay it over the rhinestones and press down gently to secure the stones to the paper.
- Rhinestone Applicator Wand: If you have an applicator wand, follow the manufacturer's instructions to pick up the rhinestones and place them on your fabric.
Step 5: Heat the Rhinestones Lay the transfer paper or applicator wand with the rhinestones on your garment, making sure they are in the desired position. Place a clean, dry, and preheated (no steam) household iron on top of the transfer paper or applicator wand.
Step 6: Apply Even Pressure and Heat Apply even pressure to the iron and keep it in place for about 10-15 seconds. This will melt the adhesive on the back of the rhinestones, securing them to the fabric.
Step 7: Allow to Cool Carefully lift the iron and let the rhinestones and fabric cool for a few minutes. This allows the adhesive to set properly.
Step 8: Remove the Transfer Paper Once the rhinestones have cooled, gently peel off the transfer paper or remove the applicator wand. Your rhinestones should be securely adhered to the fabric.
Step 9: Check and Reinforce Inspect your design to ensure all the rhinestones are properly attached. If you find any loose stones, reapply heat with the iron for a few more seconds.
Step 10: Enjoy the Sparkle Now that your hot fix rhinestones are in place, wear your newly embellished garment or show off your decorated item with pride. You're ready to sparkle and shine like a pro!
Conclusion:
Applying hotfix rhinestones is a creative and enjoyable way to add a touch of glamour to your wardrobe or crafts. With this step-by-step tutorial, you can confidently adorn your items with these dazzling gems. Remember to take your time, plan your design carefully, and enjoy the process of creating your own sparkling masterpiece.